
Creating surveys is a great way to gather information on your patient's/client's experience with your company as well as gain an understanding of how they are doing in their overall health.
Getting started:
Step 1: From the [Systems] menu → select [Drip-Education] → Click on [Survey Builder].

Step 2: At the top of the screen click [Add New Survey].

Step 3: Build the survey
- Survey Name: Add the name of the Survey so it's easy to locate in the account as well as the patient/client will see this name when they complete the survey
- Description/Instructions: Clearly outline what the survey is for and any additional instruction needed for it to be completed correctly
- Disclaimer/Footer: To protect the office, we've provided an auto-generated disclaimer that will display on the survey. Please read it, and modify as you see fit
- Add Question: By default, the builder gives you one question to start with, if more are needed, click the [Add Question] button

Work on your questions + answers:
For the Answers:
- Radio Buttons Input - Enter Answers separated by Semi-Colons (;)
- Selector Input (drop-down menu) - Enter Answers separated by commas (,)
- Checkbox Input - Enter Answers separated by Colons (:)
- Short Text Input - Leave the Answer field empty
- Long Text Input - In the Answer field, enter a question mark (?)
- Rating Input (radion buttons)- Enter Answers separated by a Tilde (~) sign and a Semi-Colon (;). This allows you to enter in a numerical rating that's up to you. For example, the patient selects "Very healthy" as an option in the survey. This relates to the number 0 which to us as the office would consider the best rating possible, whereas the patient selects "Not healthy" this is a rating of 2 which the office would consider being the worst rating. What the numbers mean/are up to each office.
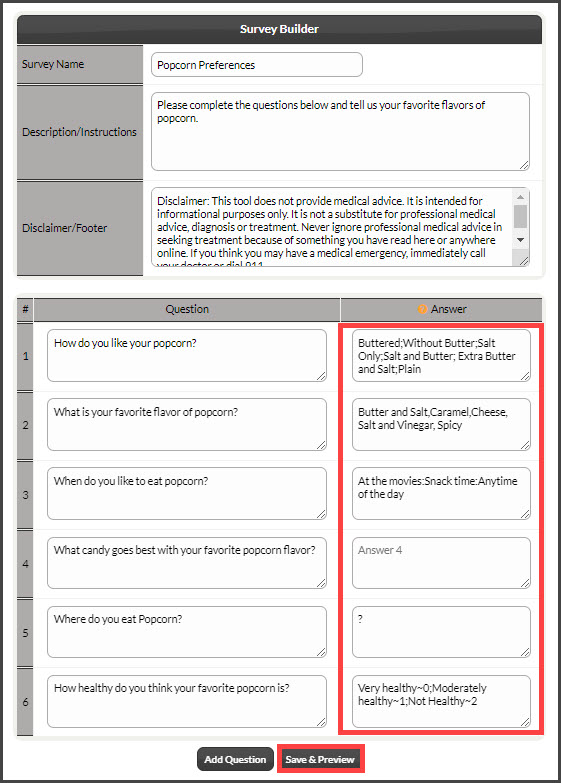
Step 4: Once complete, click [Save & Preview] at the bottom of the page.
