
To ensure you're following the correct steps, please first identify the current software version your office is using. You'll find the newer version (ClinicMind) instructions after Step 4, and the older version (Genesis) instructions further down the article.
You must first add account users for each team member:
It is highly recommended that you create separate and unique usernames and passwords for each team member and not just give them your admin login credentials to use. The purpose of this is to maintain security with your account. Each account user's Clerk Key will identify their activity for tracking usage. In addition, you can control what the account user can do, see, and when they can log in. Click HERE for instructions on how to add Account Users to Cash Practice®.
Getting started:
NOTE: Steps 1-4 are performed in your Cash Practice® account.
Step 1: You must be able to log into the Admin account OR as an Account User that has been given permission. Follow the Sequence below.
- A: Hover over the [Systems] Menu
- B: Select [Auto-Debit System®]
- C: Choose [Setup]
- D: Then click [ADS Settings]

Step 2: Click on [Step 6 Software]
- EHR Software: Select "ClinicMind" from the drop-down menu.
- Auto-Save New Patients: If you wish to have the system automatically create the patient record for you inside of Cash Practice, keep this setting as "Yes" (recommended).
- Click on the [Save Step/ Next] button to save your changes.

Step 3: Go back to [Step 6 Software] and click on the [View TPS Keys] tab.

Step 4: Collect the Integration Keys. The two Integration Keys located on this page are unique to your Cash Practice® membership - the CP_ ID and the CP_ MKey. The [Clerk Key(s)] are unique to each Account User. All user account privileges and login times are respected. CLICK HERE for instructions on how to create Cash Practice® user accounts.

ClinicMind: Current version

NOTE: Steps 5-8 are performed in your ClinicMind® (Genesis®) account.
Step 5: Log in to your ClinicMind account.
Step 6: Follow the instructions HERE to subscribe to Cash Practice within ClinicMind® (Genesis)
Step 7: From the sidebar menu on the left:
- Select [Configuration]
- Choose [3rd Party Services]
- Click [Merchant Configuration]
Step 8:
- Enter your Provider Identifier and Provider Key (this is your CP_ ID and CP_ MKey). Be sure to check that an extra space wasn't added to the front or back of the code if you copied/pasted the code.
- The [Date Start] field is only needed if you do not want to start transferring payments from your Cash Practice® account immediately. The date here would be the date you wish to start the transfers.
- You will see a list of all your users in the space below. Select a login that should have access and enter their Clerk Key in the right-hand column.
- Enter the unique Clerk Key(s). The Clerk Key(s) are unique to each Account User.
- Once all codes have been entered, click the [Save] button at the bottom left side of the page.

Step 9: From the schedule, select a patient appointment and confirm if [Credit ACH] and [Point of Sale] are already pinned. If not, select the ellipsis icon and choose [Customize Menu]. Turn on and pin Credit ACH and Point of Sale. Click [Save].

Genesis: Previous software version
NOTE: Steps 5-8 are performed in your Genesis® account.
Step 5: Next, log in to your Genesis® account.
Step 6: Follow the instructions HERE to subscribe to Cash Practice within Genesis
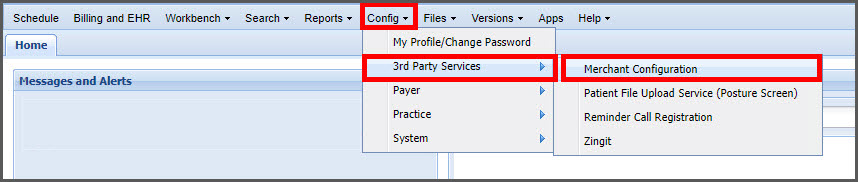
Step 7: From the Genesis® top menu:
- Select [Configuration]
- Choose [3rd Party Services]
- Click [Merchant Configuration]
Step 8:
- Enter your Provider Identifier and Provider Key (this is your CP_ ID and CP_ MKey). Be sure to check that an extra space was not added to the front or back of the code if you copied/pasted the code.
- The [Date Start] field is only needed if you do not want to start transferring payments from your Cash Practice® account immediately. The date here would be the date you wish to start the transfers.
- You will see a list of all your users in the space below. Select a login that should have access and enter their Clerk Key in the right-hand column.
- Enter the unique Clerk Key(s). The Clerk Key(s) are unique to each Account User.
- Once all codes have been entered, click the [Save] button at the bottom left side of the page.
If you do not immediately see Cash Practice as an option when following the instructions HERE, sign out and back in. Try once more.