
Before processing a transaction within ChiroTouch®, you must first have completed the integration and setup. Click HERE for instructions.
To access the Payment screen when checking out a patient:
A. Select a patient who is checked in and click the [Check Out] button.
B. From the Patient Check Out screen, click the [Payment] button.
To access the Payment screen from the Ledger:
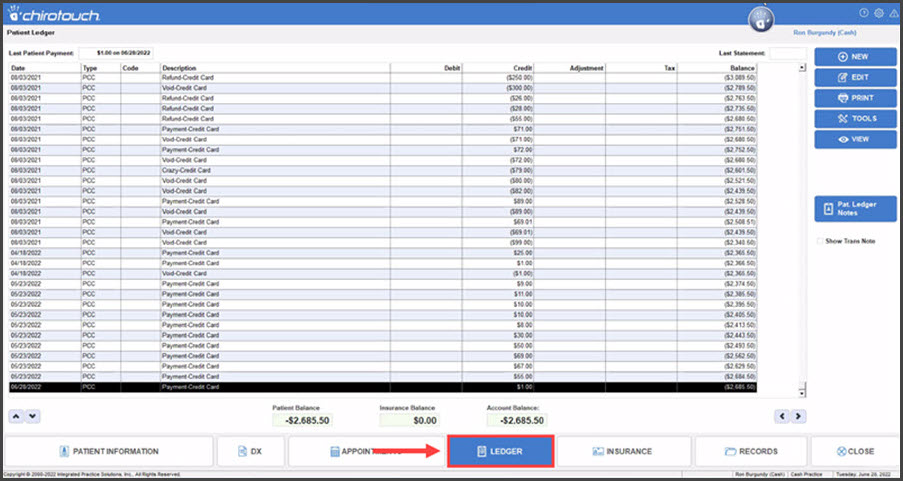
Step 1: Select your patient from the list and click the [Ledger] button.
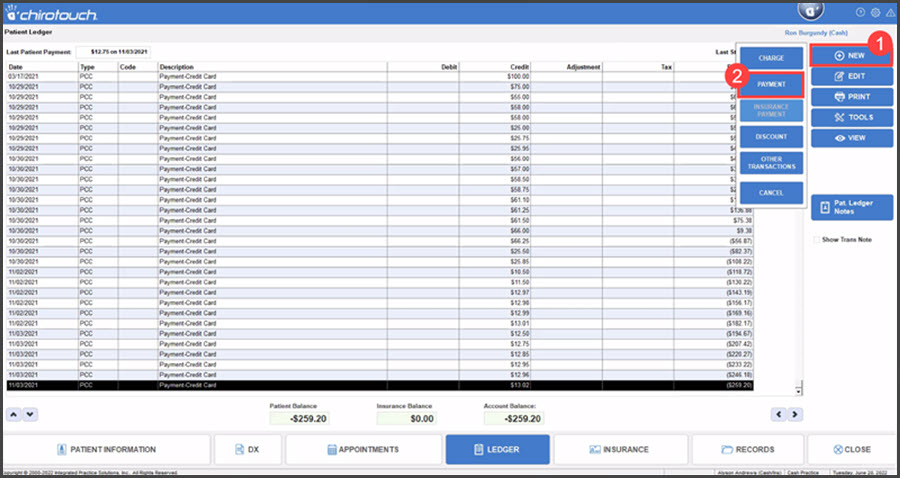
Step 2: Click the [New] button and select [Payment].
Step 3: On the Payment screen, click on the [Amount Collected] field and enter in the amount you need to collect from the patient → click the [Credit Card] button. (If not already defaulted) → make sure the box is checked to [Process Payment Online] → click [Post Payment].
* If processing with a Bank EFT, click on the [Direct Debit] button.

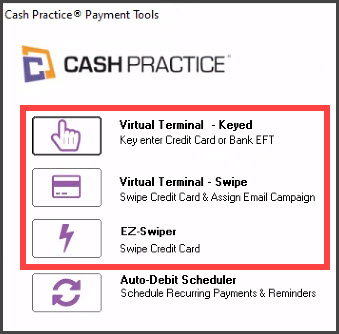
Step 4: Select which Auto-Debit System® payment tool you are going to use.
- Virtual Terminal - Keyed: Access stored billing information OR manually enter a new credit/debit card.
- Virtual Terminal - Swipe: Swipe a credit/debit card using a USB card reader AND capture the billing address to use for a future transaction using the [Virtual Terminal-Credit Keyed].
- Note: By default, this payment tool will store the card on file for future use. If you do not want the system to save the card by default, you can change the setting in Step 12 of THIS article.
- EZ-Swiper: Swipe a credit/debit card using a USB card reader without capturing the billing address.
- Note: By default, this payment tool will NOT store the card on file for future use. You are given the chance to manually check a box to [Save to Billing Vault] which will store it on file for future use. If you not want the system to save the card by default, you can change the setting in Step 12 of THIS article.
- Auto-Debit Scheduler: Schedule a future, recurring payment using the Auto-Debit Scheduler™. *Must have the full Auto-Debit System® membership.
Virtual Terminal - Keyed
Key entering card information or pulling stored billing information from Cash Practice® requires a billing address. Using the Virtual Terminal - Keyed, will also allow you to send out a Cash Practice® Drip Education® Campaign if you have the Cash Practice® Drip Education® System module.
Note: If this is the first transaction for a new patient and a patient account has not yet been created inside Cash Practice® the action of you processing this payment will automatically pre-populate the patients demographics into Cash Practice, creating their patient record. "Patient Address" is not the same as "Billing Address", so you will be required to save the Billing Address on file the first time you do a Key-Entered transaction.
Step 1: Select the Virtual Terminal - Keyed option and fill in all of the required fields. CVD code is optional; if the code is not entered, the transaction will still process without it.
- (Optional) Comments: These are not viewed by your patients, they are only visible to on the Posted Payments Report™.
- (Optional) Patient Groups: This gives you the ability to group your patients based on whatever parameters you would like. You can then use this to keep track of your patients and leads and also efficiently target market.
- (Optional) - Drip-Ed™ Campaigns: This allows you to assign emails at the time of processing your payment ( requires the Drip-Education System®)
- (Optional) Auto-Debit Groups™: This allows you to categorize your payments into groups and track its revenue.
- (Optional) - Care Plan Option: If you want to identify this payment as Option 1,2 or 3 from a Care Plan, do so here. This will allow you to keep accurate statistics for how much income is generated and expected from each payment option.
Step 2: Click on the [Process Card On-File for $X] button to submit the payment.
Step 3: The patient's receipt will display on the next screen (be sure to wait for it to fully load). Click the [Print] button to print the receipt, or [Close] button to close the receipt window. The payment will then automatically post the patient's ledger.
Virtual Terminal - Swipe
Virtual Terminal - Swipe (no data entry required unless you adjusted your settings - See link above in Step 4) will also allow you to send out a Cash Practice® Drip Education campaign if you have the Cash Practice® Drip Education® System Module
Note: If this is the first transaction for a new patient and a patient account has not yet been created inside Cash Practice® the action of you processing this payment will automatically pre-populate the patients demographics into Cash Practice, creating their patient record.
Step 1: Select the Virtual Terminal - Credit Swiped option and fill in all of the required fields.
- (Optional) Comments: These are not viewed by your patients, they are only visible to on the Posted Payments Report™.
- (Optional) Patient Groups: This gives you the ability to group your patients based on whatever parameters you would like. You can then use this to keep track of your patients and leads and also efficiently target market.
- (Optional) - Drip-Ed™ Campaigns: This allows you to assign emails at the time of processing your payment ( requires the Drip-Education System®)
- (Optional) Auto-Debit Groups™: This allows you to categorize your payments into groups and track its revenue.
- (Optional) - Care Plan Option: If you want to identify this payment as Option 1,2 or 3 from a Care Plan, do so here. This will allow you to keep accurate statistics for how much income is generated and expected from each payment option.
Step 2: Swipe the credit card through your card reader.
Step 3: The patient's receipt will display on the next screen (be sure to wait for it to fully load). Click the [Print] button to print the receipt, or [Close] button to close the receipt window. The payment will then automatically post the patient's ledger.
EZ-Swiper™
The EZ-Swiper™ (no data entry required unless you adjusted your settings - See link above in Step 4) will allow you to quickly swipe cards with no additional data entry required.
Note: If this is the first transaction for a new patient and a patient account has not yet been created inside Cash Practice® the action of you processing this payment will automatically pre-populate the patients demographics into Cash Practice, creating their patient record.
Step 1: Select the EZ-Swiper™ option
Step 2: Swipe the credit card through your card reader.
Step 3: The patient's receipt will display on the next screen (be sure to wait for it to fully load). Click the [Print] button to print the receipt, or [Close] button to close the receipt window. The payment will then automatically post the patient's ledger.