
Use the Posted Payments Report Generator™ to do the following:
- Review transactions
- Reschedule declined payments
- Process pending payments
- Manage alerts
- Print copies of sales receipts
- Review billing histories
- Attach an Auto-Debit Group™
For instructions on how to access the Posted Payments Report Generator™ click HERE.
Below is a detailed explanation of each of the Posted Payments Report Generator™ columns:
Column 1: Order-ID & Schedule-ID, Transaction selector checkbox:
- Order-ID: This is the unique ID number for the transaction.
- Schedule-ID: If the transaction was the result of a scheduled auto-debit, the Sch-ID of the auto-debit will be listed.
- Transactions selector checkbox: This box allows you to select the specific transaction to archive or download. Only transactions that are accepted and need no action will have a checkbox.
Column 2: Date & Clerk
- Date: Lists the date and time the transaction was processed.
- Clerk: States the name of the Account User who processed the transaction or scheduled the auto-debit.
Column 3: Client Details
- Client Name and Picture (if uploaded): This is the name of the Client Account. After clicking the [Client Name], a window will open allowing you to view the Client's Record.
- Customer ID: This is a unique number given to the client upon being added to the Cash Practice® database.
- Third-Party Software (TPS): This is a unique identifier generated by the TPS system used in the office (if you do not use a TPS this will not appear). See the example for the client, Mrs. Mary Smith [12345].
Column 4: Billing type
- Billing Name: This is the name used on the billing. Either the name on the credit card or bank account.
- Card: The last four digits of the card number and its expiration date.
- Bank EFT: The last four digits of the bank account number are listed with either PC (Personal Checking) or PS (Personal Savings).
- Auto-Debit Reminder: Auto-Debit reminders giving you the ability to create scheduled payment reminders. Auto-Debit Reminders are to be used when the client has a recurring payment that needs to be collected, but the payment is not running automatically in Cash Practice. A reminder will not collect a payment, it is simply a reminder for your office that the payment is due.
- Cash: Cash transactions may be recorded through the Cash Practice system. It's very important that you have strong procedures in place as to how your office collects, records, and tracks cash.
- Status: This indicates the result of the transactions.
- Accepted: This means the transaction was successful. The approval number is listed as well.
- Pending: This means the transaction is waiting to be processed. This will occur when a Reminder needs to be collected or a previously declined transaction gets rescheduled.
- Declined: This means the transaction was declined. The Error Code displays below. Click on the error code to view the Error Code Manual. The reason as for while the transaction declined will also show in the "Description, Auto-Debit Group & Comments" column.
- Returned: This occurs when a Bank EFT is returned by the bank. This is similar to a bounced check. Since the report has the original payment as accepted, a new entry is made with the Returned. The Return code along with the original Ord-ID displays below. Click on the Return code to view the Return Code Manual. The reason as for while the transaction returned will also show in the "Description, Auto-Debit Group & Comments" column.
- Failed: This means the transaction failed. It lists the original Ord-ID that failed. This indicates that the payment did not process (usually a technical issue).
- Canceled: This means the transaction was canceled. This will occur when either a Pending or Declined transaction gets canceled.
- Refunded: This means the transaction is a refund for the Ord-ID listed with it.
- Processing: Transaction is in line to process in the system batch.
- Collected: This means the Auto-Debit Payment Reminder was successfully collected.
- Merchant Account Type: Indicates the result of the transactions.
- Internet/MOTO: Transaction was processed with your Internet/MOTO merchant account (used for credit-keyed and bank EFT).
- Retail: Transaction was processed with your Retail Merchant Account (used for swiping or with CP Mobile™)
- CVV Response Code: This will indicate if the provided CVV code was accurate. Although not required, some (not all) banks will downgrade the rate charged to a higher fee if it is missing or inaccurate. (One-Time Payments using Credit-Keyed with Internet Merchant Account).
- AVS Response Code: The Address Verification Service (AVS) is a feature that verifies the billing address. Both the Street Address and Zip Codes are verified. If either of them shows No Match, a bank will downgrade to a higher rate. If both are No Match, a bank will downgrade to an even higher rate. If you would prefer to have a payment Decline as a result of either of those two scenarios, please notify us and we will update your AVS setting to decline the payments. (One-Time & Recurring Payments using Credit-Keyed with Internet)
Column 6: Amount
This column displays the amount of the posted transaction. *If you see the same amount in red beneath the value of the transaction, it means it was either declined or returned. See "Column 8: Description, Auto-Debit Group™ & Comments" description for details.
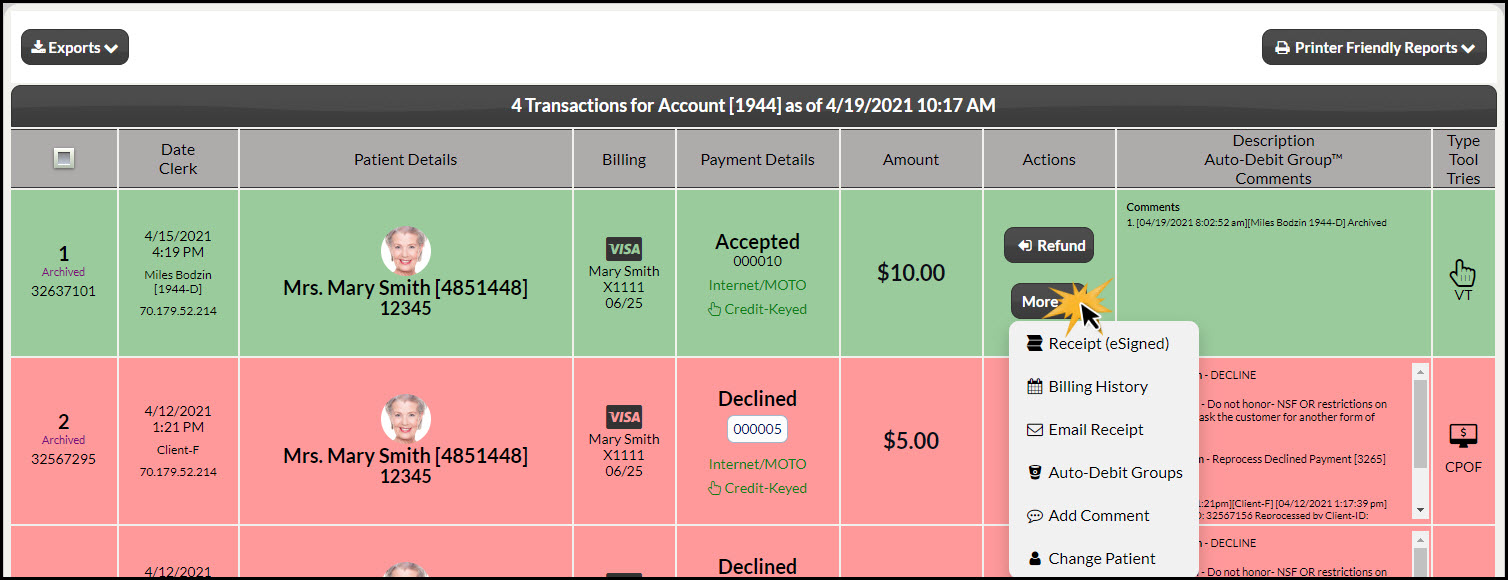
Column 7: Actions
This drop-down menu will have several different options, depending on the result of the transaction.
- [Receipt]- View or print a receipt for the transaction.
- [Billing History]- View or print the client’s full billing history from this button
- [Email Receipt]- This button will open the Email Alert Sender. The Email Alert Sender will allow you to send an email receipt of that transaction to the client and insert a custom note.
- [Auto-Debit Groups] -This will allow you to attached additional Auto-Debit Groups™ to your transactions, as well as removing them.
- [Add Comment]- This will allow you to make an internal note.
- [Void]- The voiding button is only available before the transaction batches around midnight - This button will then be replaced with the [Refund Payment] option.
- [Refund]: This button allows you to refund the transaction for the whole amount, or partial.
- [Process Payment] -This button will allow you to immediately process a payment. If payment is set to pending it will process automatically when the system batches itself.
- [Reschedule] - The reschedule button, appears when a credit card payment is declined. It will allow you to edit the payment and set it to reprocess.-This is the Reschedule Returned EFT button. It appears when a Bank ETF payment is returned. It will allow you to edit the payment and set it to reprocess.
- [Cancel]-This is the Cancel button. It appears when a payment is declined, returned, or pending. (only cancel a payment if you will be collecting payment some other way i.e.: cash)
- [Remove Alert]- This button will allow you to remove the Not Paid Up alert from the Auto-Debit Status Report™
- [Collect]-This button will mark a scheduled Auto-Debit Reminder as collected. Marking it as collected means you are collecting payment manually, via cash or check over the counter, and will not be processing the payment with the Auto-debit system. For more information on processing tools for Auto-Debit Payment Reminders: click HERE.
Column 8: Description, Auto-Debit Group™ & Comments
- Description: The name of the Care Plan for this transaction along with the Cash Plan payment option will be displayed if the payment was processed with the Cash Plan Auto-Debit Scheduler™.
- Auto-Debit Group: This designates which Auto-Debit Groups™ are currently assigned to the transaction.
- Comments: All comments that are auto-generated or typed in the Description field are displayed when your mouse is held over the word comment.
- Decline Reason: The reason why the transaction declined.
- Decline Action: The action needed to handle the reason why it declined.
Column 9: Type, Tool & Tries
- Type: Indicates the transaction type.
- New: Indicates a non-scheduled transaction. This occurs with the Simple Swiper™, Virtual Terminal, or from the Initial Payment made with the Cash Plan Auto-Debit Scheduler™.
- Sch: Indicates the transaction that occurred from the processing of a Scheduled Auto-Debit.
- Rep: Indicates a repeated transaction. This occurs when a previously declined transaction gets reprocessed.
- Test: Indicates the transaction was done in Test Mode.
- Tool: This indicates which of the payment tools were used to process the payment.
- SS: Simple Swiper™
- VT: Virtual Terminal™
- VT-S: Virtual Terminal Swiped Transaction
- ADS: Auto-Debit Scheduler™
- ADS-S: Auto-Debit Scheduler™ Swiped Transaction
- ADS-R: Auto-Debit Payment Reminder™
- CPADS: Cash Plan Auto-Debit Scheduler™
- CPADS-S: Cash Plan Auto-Debit Scheduler™ Swiped Transaction
- CPM: CP Mobile™ Transaction. The device type will display ie: iPhone, iPad, Android.
- EMV-C: EMV Chip terminal
- Tries: Indicates the number of times a declined transaction has been attempted
- EZS: EZ Swiper™