To get started, follow the sequence below.
- A: Hover over [Systems]
- B: Click [Care Plan Calculator®]
- C: Click [Setup]
- D: Select [CPC Settings].

Please watch each of the short videos in the setup by Founder & CEO, Dr. Miles Bodzin, to help you successfully set up your default Care Plan settings.
The Care Plan Calculator has been preloaded with general settings that work for most practices. We suggest that you start by customizing [Steps 3, 4 & 5] and leave the other settings as-is until you get the hang of making plans that suit your practice style.
Have you already completed the setup? Click HERE to go to the next part of the training.
Step 1 of 10: Start Here
Factory Reset: This resets the entire Care Plan Calculator® settings to the original settings. Please note that this is a permanent action and CAN NOT BE REVERSED.
Version: Displays the current version of the Care Plan Calculator® that the account has. Future updates to our system may require an update here.

Step 2 of 10: Plans
Note: This step of the setup remains the same for all plans. Changes made here will affect all plans, including those previously created.
You can edit the "Plan Titles" and "Intros" of your Plan 1 & Plan 2 types. These are the names that will "title" your plans.
- Choose a default [Plan Type] - The default will display when creating a new plan.
- Plans with Start and End Dates (New Patients) - Plan Title: Keep as is (Corrective Care Plan), or change it to how you want these plans to display. The new patient plan is designed to provide a set of services within a given period of time. The key is that there is an END to the plan. This is the plan that should make up the bulk of your new patient sign-ups.
- Plans that Auto-Renew (Established Patients) - Plan Title: Keep as is (Wellness Care Plan), or change it to how you want these plans to display. The established patient plan is similar to Plan Type 1, except that it is designed with no end date. This is usually for your wellness/ongoing care.

Step 3 of 10: Services
Note: Portions of this step of the setup can be edited/changed on individual plans.
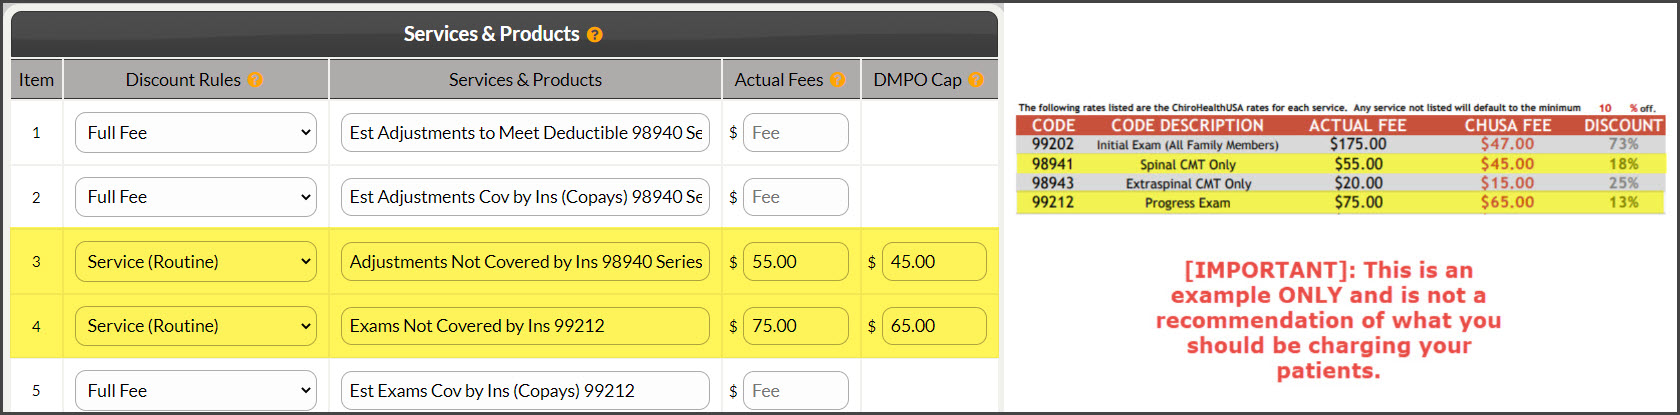
IMPORTANT: You have 1 fee for each service/product that you provide. There is no such thing as a cash fee, insurance fee, etc. In the [Fees] column, list your actual fee for the service/product. Read: Developing a Rock Solid and Compliant Discounting Policy
In the [Discount Rules] column, you will indicate the appropriate discount rule that is applied to the service/product.
- Discount Rules: Designate whether the service should be discounted.
- Services & Products: Add in your most commonly offered services and products for plans. There are 15 lines.
- Actual Fees: List your full and Actual Fees for services and products. This allows the system to calculate the plans and discount amounts properly.

For offices using a DMPO like ChiroHealthUSA, and having discounts entered in Step 5, this will look different.
Below is an example of the DMPO Cap column being displayed. This allows the entry of specific prices for services/products as defined by your chosen DMPO that are different than your set discount. For example, the office below has a ChiroHealthUSA discount on all services of 10%. But for their Spinal CMT Only (98941) their Actual Fee is $55.00 but their CHUSA Fee is $45.00. This $45.00 will be entered into the DMPO Cap column, and our system will calculate the discount between the Actual Fee and the Capped/CHUSA Fee.
Step 4 of 10: Prompt Pay %
Note: Portions of this step in the setup can be edited/changed on individual plans.
Prompt Pay Discounts are a great way to reduce the cost of care when patients enroll in your care plans, and our plans have several different types of discounts that can be applied.
Prompt Pay:
- Services: This discount is applied to ALL services except Family Prompt Pay Discounts (patients 2-7), No Charge, Full Fee items, ChiroHealthUSA®, and other DMPO% services.
- Add an individual service discount per Patient on the plan. This is beneficial when creating family plans for more than one person, where the intent is to increase the discounts with the number of people on the plan. For example, Dr. Jones wants to make a family plan for 3 people, but have the discount increase from 5% for the Mom (Patient #1) to 7% for the Dad (Patient #2) and then 10% for their child (Patient #3).
- If you don’t wish to use these tiered types of discounts edit each box to match the discount listed for Patient #1.
- Products: Set a discount for any products that need a more individualized percentage.
- Custom Products: Enter the discount you would like to use for custom products. For example, you may want to provide a different discount for custom-made orthotics vs. non-custom.
Max Prompt Pay Discount Alerts:
- A: Max Discount: Enter a value that is your maximum allowed for that entry. This will cause the system to alert you if a value greater than the maximum is entered into a plan. Leave empty or set to 0 for no maximum.
- B: Enforce Max?: If you've entered a Max Discount, you can then trigger an alert when a value is entered into a plan that is greater than the maximum. This prevents over-discounting a plan.
- Strict: Does not allow values greater than maximum.
- Warn Only: This will alert you if the value being used is greater than the maximum allowed, however, it will still allow it.

Step 5 of 10: DMPO%
Although not required, we recommend using a Discount Medical Plan Organization (DMPO) such as ChiroHealthUSA® (CHUSA) with your Care Plans. The primary advantage is that you can legally create a discount schedule for non-insured services. You can also set a maximum per-visit fee no matter what services you provide. This allows you to maximize insurance reimbursement while making care affordable for non-covered services.
If your office has another DMPO that has a similar structure for discounts like ChiroHealthUSA®, those discounts may be entered into this section to be used on plans.
*SAMPLE FOR ILLUSTRATION PURPOSES ONLY*

Related: How do I enter my ChiroHealthUSA® provider Fee schedule into the Care Plan Calculator® System?
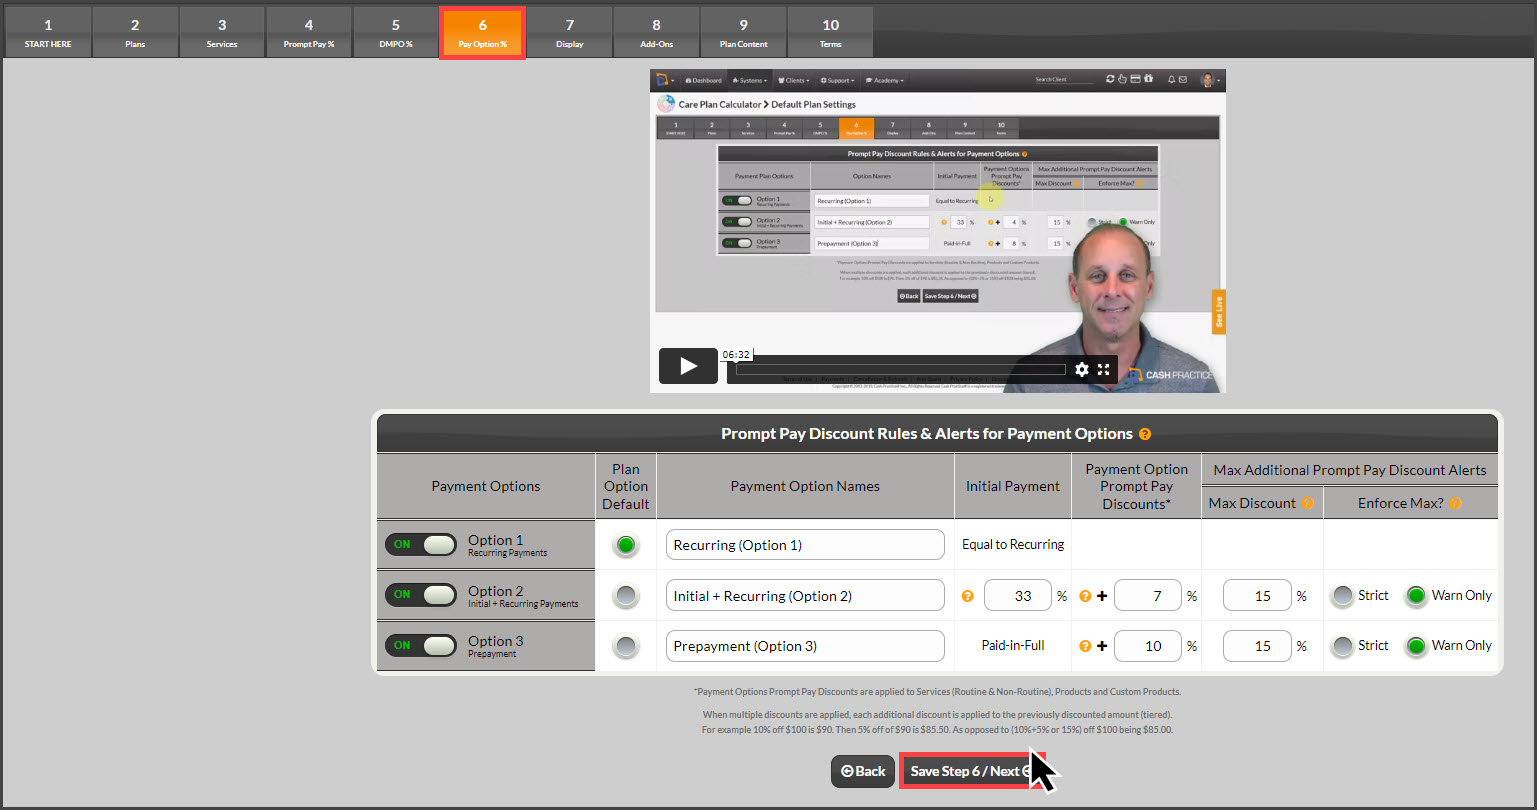
Step 6 of 10: Pay Option %
The plans have three payment options. By default, they are labeled Recurring (Option 1), Initial + Recurring (Option 2) & Prepayment (Option 3). If you would rather name them something else you can do that here. Names such as Silver, Gold & Platinum or Good, Better & Best are common examples.
If by default, you do not want to offer an option, set the toggle to OFF. You can also turn the options ON/OFF when building plans or templates.
- Option 1 Recurring: This payment option evenly spreads payments over the payment time frame. For example, your office is creating a 6-month plan where the patient is paying 6 monthly payments. This option will break down the payment into 6 even slices. It will also, by default, have the Service Discount automatically applied to it as outlined in Step 4.
- Option 2 Initial + Recurring: Option 2 breaks down payment of the plan into an initial/down payment, with even recurring payments after. For example, your office is creating a 6-month plan that includes payment option 2. The patient would pay the initial/down payment (33% or other % you set), which would cover month 1, and then 5 even monthly payments starting month 2. Option 2 also allows for an additional discount to be applied as an incentive for the patient to choose this option. In the image shown, the default discount set is 7%. This combines with the Service Discount of 5% to be approximately 12% off Option 2.
- Option 3 Prepayment: Payment Option 3 allows the patient to make the choice to pre-pay for the plan in full. This also gives the ability to add an additional incentive discount for choosing to pay all at once. The discount example I have listed is 10% which combines with our Service Discount of 5% which makes pre-pay approximately 15% off.
Step 7 of 10: Display
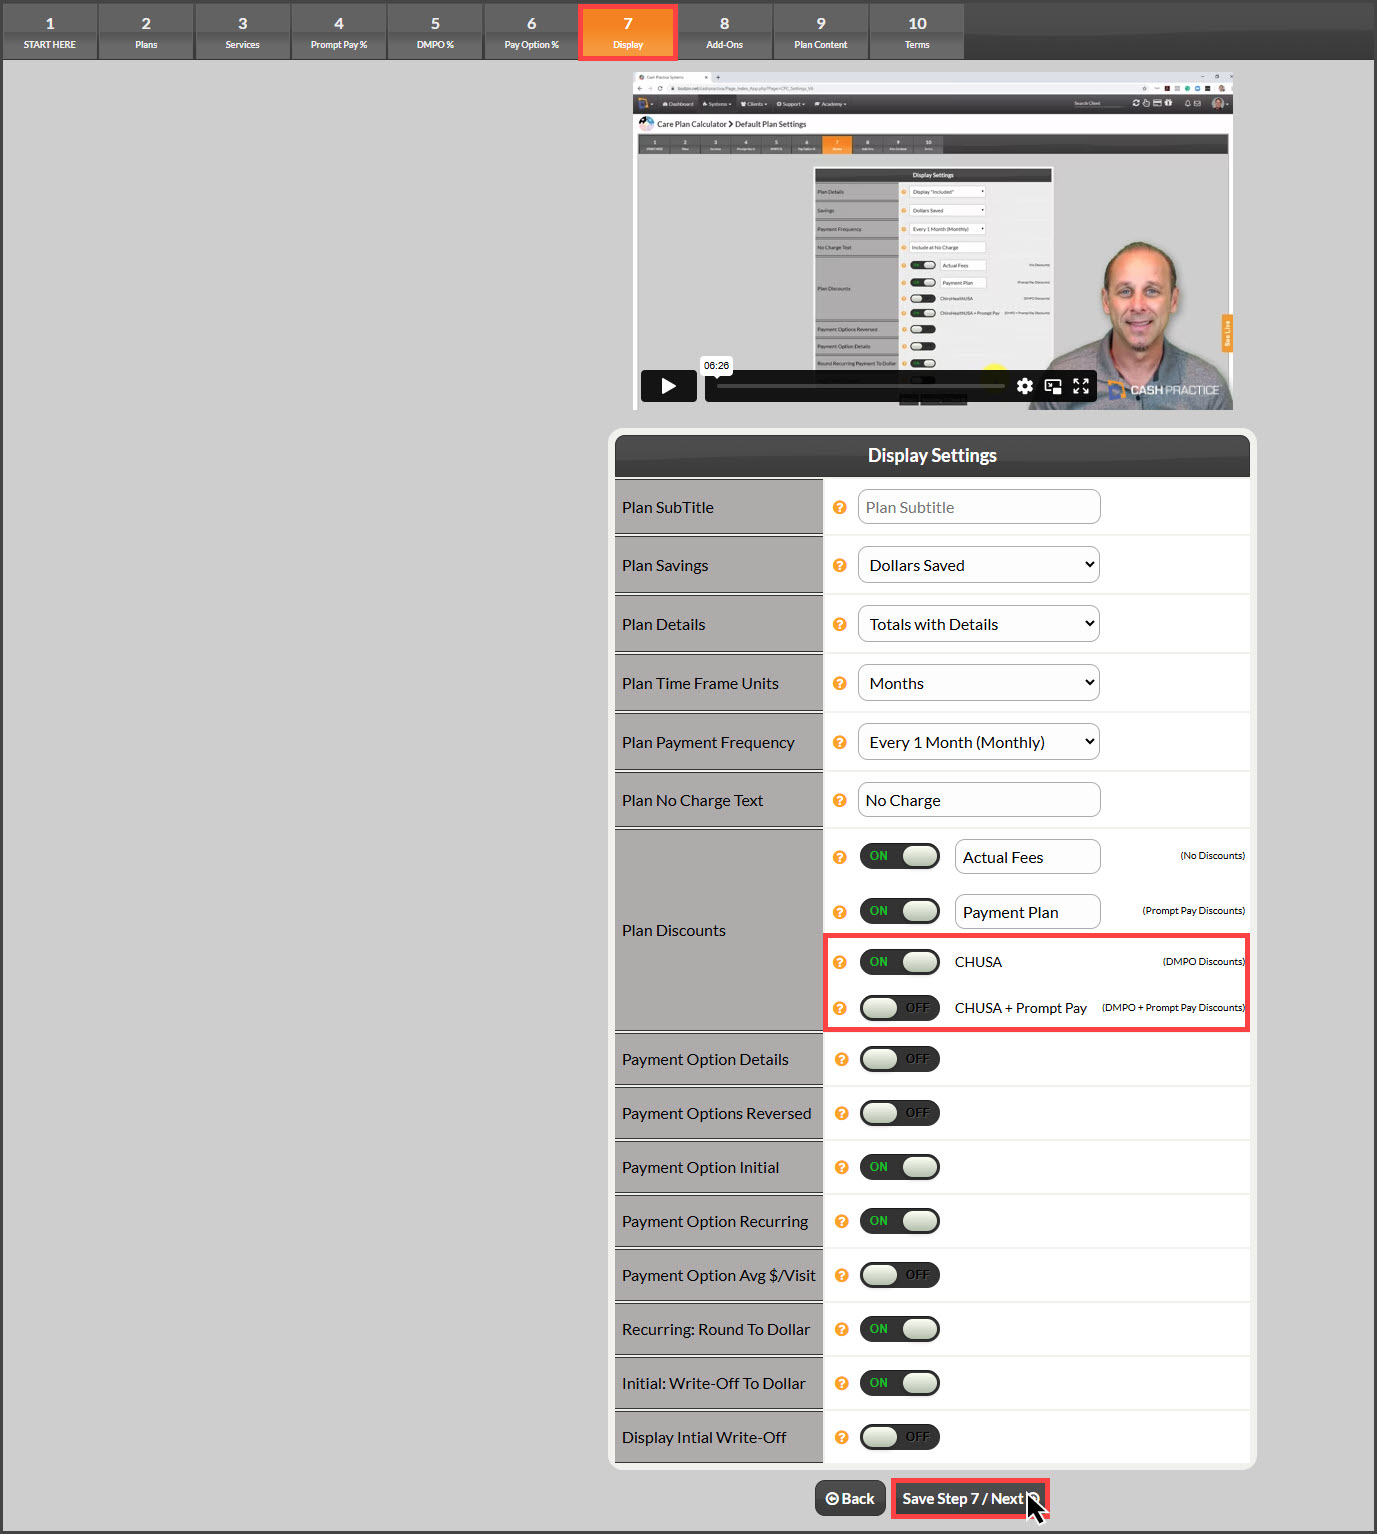
Display Settings for the look and feel of the plan.
- Plan Subtitle: Add a phrase or information below a care plan's title that the patient will see when presented
- Plan Savings: We recommend setting "Dollars Saved" as it's reported to be the most effective in motivating patients without creating confusion.
- Plan Details: We recommend "Totals with Details" when printing the plan for a patient as it provides the most detail, however, you may simplify this by selecting "Totals Only" or "Display as Included"
- Plan Time Frame Units: Select whether you want the defaulted duration of your plan to be set as months or weeks
- Plan Payment Frequency: Select the default frequency for your plan's auto-debit payments. The options are Monthly (default), Bi-Weekly, or Weekly.
- Plan No Charge Text: When items are included at No Charge, this text will indicate the no charge. Examples of alternate text would be “Free” or “Complimentary”.
- Plan Discounts: When the plan is calculated all the plan services and products will be broken down into the Plan Discount columns. These are to show the difference in price between all of your offerings. For offices NOT using a DMPO or ChiroHealthUSA, the last two sliders will not be shown in your account.
- Payment Option Details: Set to ON, if you want by default the added details displayed with the Payment Options. When presenting plans to your patients, you may find it helpful in some cases to have it ON and in others to have it OFF.
- Payment Options Reversed: Set to ON if wanting to have Option 3 Prepayment show on the plan as the first option. This would move Option 1 Recurring to be displayed as the last option.
- Avg $/Visit Column: Set to ON to include the Avg $/Visit Column in the Payment Options Table. When building plans, we recommend this is ON so you can ensure your Avg $/Visit is not less than your Target Collection Level (TCL).
- Recurring: Round To Dollar:
- ON: All recurring payments will be rounded down to the nearest dollar (No Cents).
- OFF: All $ calculations are rounded to the penny ($0.01). Select this method if you want exact calculations.
- Initial: Write-Off To Dollar:
- ON: The initial payment will be rounded down to the nearest dollar (no cents). Please note that by turning this in, you are writing up to $0.99 off the initial payment
- If ON, you will have the option to display the write-off amount on the version of the plan the patient sees. OFF to not display it, ON to display it
- OFF: All $ calculations are rounded to the penny ($0.01). Select this method if you want exact calculations.
- ON: The initial payment will be rounded down to the nearest dollar (no cents). Please note that by turning this in, you are writing up to $0.99 off the initial payment
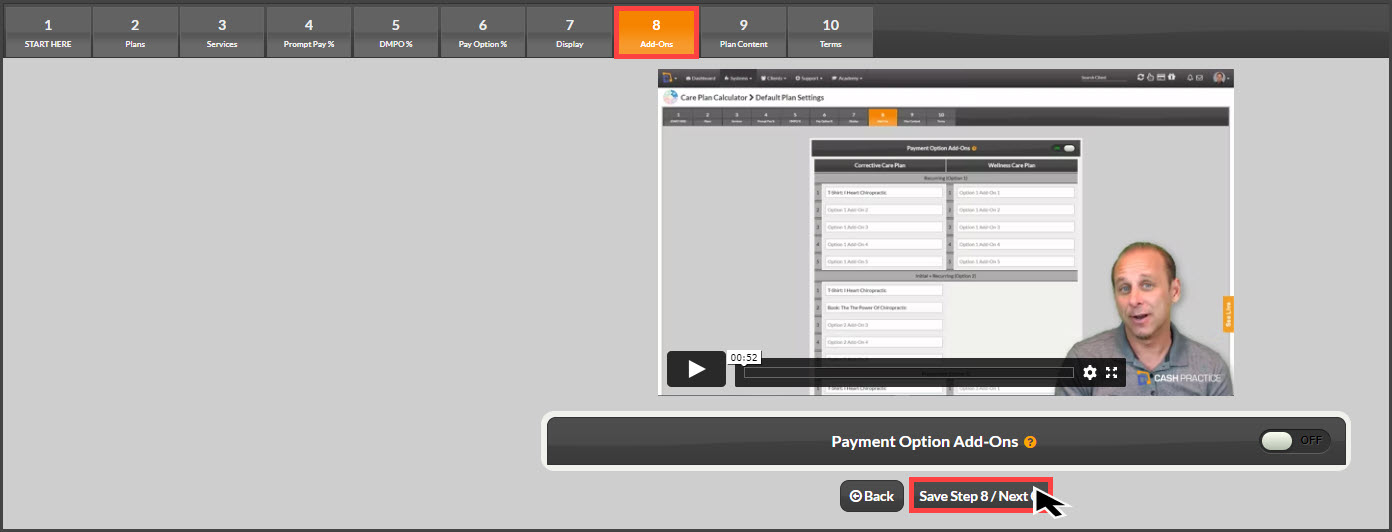
Step 8 of 10: Add-Ons
By default, this section is turned OFF. If you would like to add details to a payment option, you can list them here by turning the slider ON. Each payment option is given its own set of details. For instance, if the office wanted to include an “I love my Chiropractor” T-shirt if a patient chooses a specific payment option, this is where it can be listed.
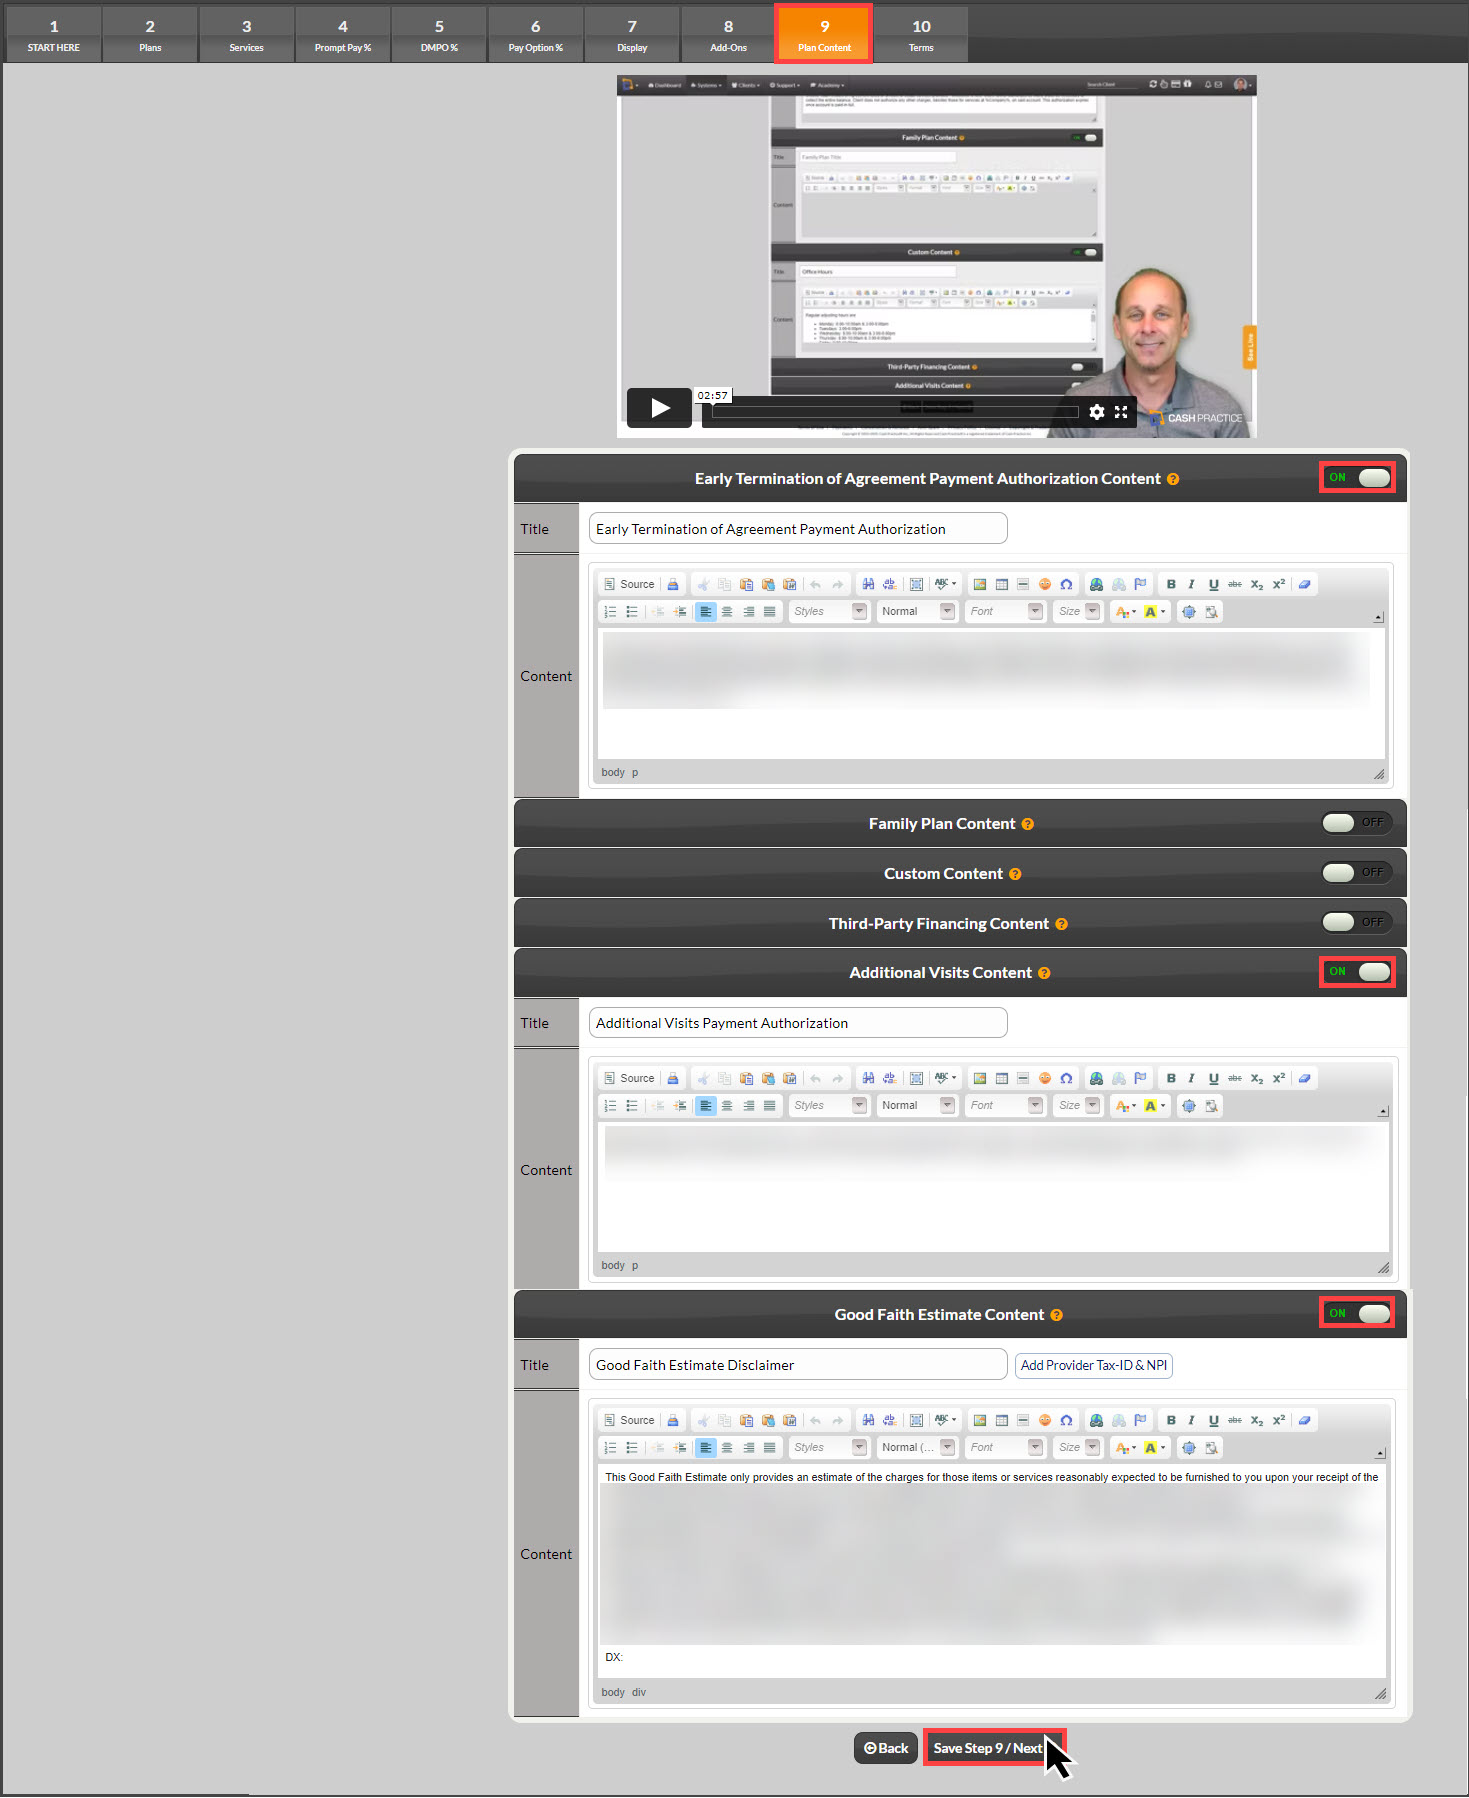
Step 9 of 10: Plan Content
This step outlines what content will be included in the printed version of your plans. The image example and default setting have both the Early Termination Agreement and the Additional Visits section included on all plans. These can be turned ON and OFF per plan if needed, as well as individual section terms can be edited here to match any specific policies the business may have.
Good Faith Estimate: This section contains the Good Faith Estimate Disclaimer to help satisfy the Patient No Surprises Act for all USA subscribers. Click the button to [Add Provider Tax-ID & NPI].
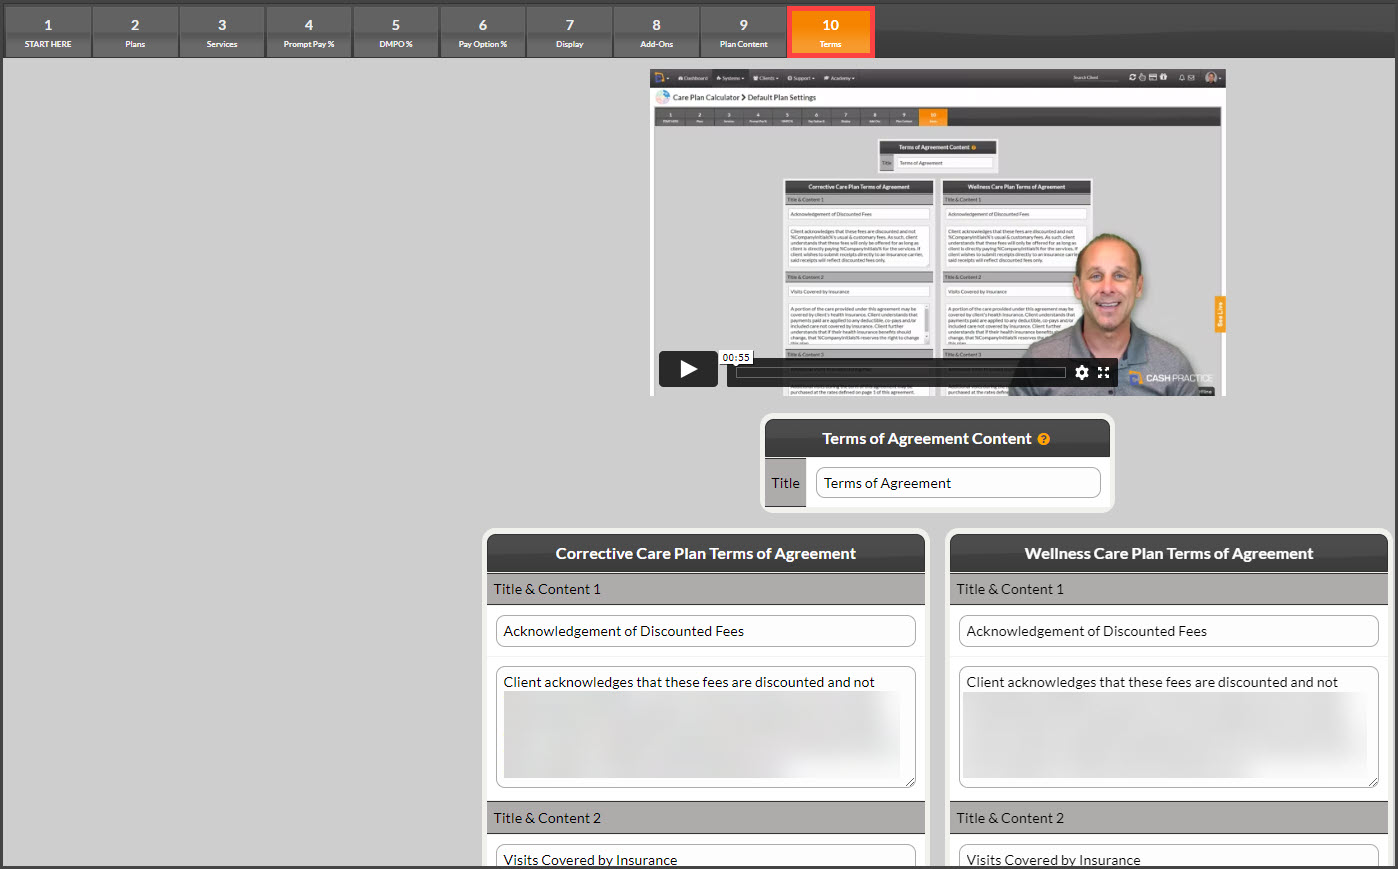
Step 10 of 10: Terms
This section has the text of the Terms of Agreement, for Plans 1 & 2. The Block of Services plan does not need/have a Terms of Agreement. The copyrighted default text is already in place.
- You may edit the Terms of Agreement Section Title.
- You may edit the Titles & Descriptions for each paragraph of the two plans. Your company initials have already been inserted into the text for you.
Subscriber agrees that you are solely responsible to check with your individual state licensing board and state laws pertaining to the content, legality, and implementation of these materials. You acknowledge and agree in advance there is no claim made as to the legality of the content of the materials and that the materials are for informational purposes only. Furthermore, you agree there is no claim made or guarantee as to any results or outcomes from the materials provided to members.
**California Doctors: Per the rules of the California Board of Chiropractic Examiners, these terms of the agreement, as written, have been submitted and reviewed in the State of California by the Department of Managed Care. Any changes would require re-submittal in CA.
Already completed the Setup? Click HERE to go to the next part of the training.