
In this article, you will learn how to make a template plan using the Care Plan Calculator that includes ChiroHealthUSA.
The images and video below are for demonstration purposes only and not a recommendation of what fees you charge, what your discounts should be or what your treatment plans should be.
Before you make a plan with CHUSA, you must first complete the CHUSA setup. Related Article: Setup - How do I enter my ChiroHealthUSA® Discount Schedule into the Care Plan Calculator?
If you got everything you need from the video ...you're done! If you need further instruction, please review the information below:
To get started, follow the sequence below.
- A: Hover over [Systems]
- B: Click [Care Plan Calculator®]
- C: Select [Add New Care Plan]

This section will expand as sections are filled or selected.
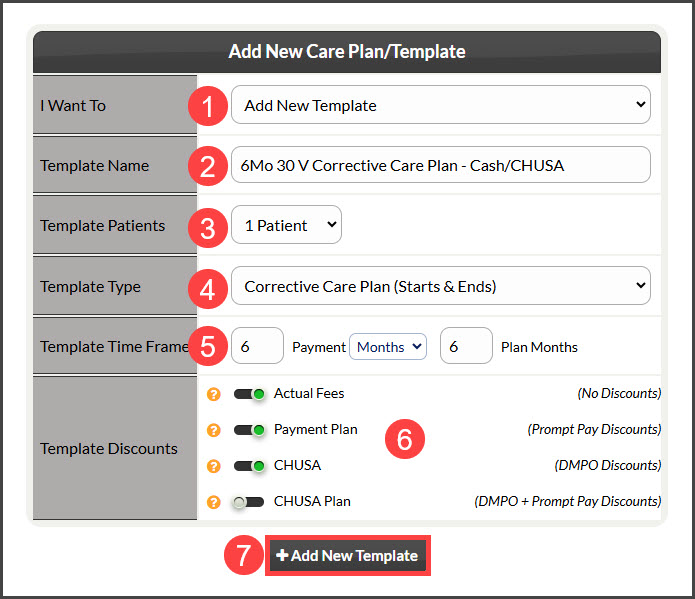
- From the “I Want To” section, select the Action as [Add New Plan] or [Add Template] if you are creating a template plan.
- Care Plan Name: Enter a plan name using characters A-Z, a-z, and 0-9. You can either give a generic name, such as "24 visit 6 mo plan" or a specific name, such as "CHUSA Mary Smith’s 24 visit 6-month corrective care plan". Choose a name that identifies the plan so it can be easily found when you have a large list of plans. NOTE: The plan name is NOT seen by the patient. It is only viewable by account users; therefore, the plan name should be as descriptive as possible.
- Care Plan Patients: Select the number of plan members. Up to seven members of a family can be on one plan.
- Care Plan Type: Choose the Corrective Care Plan (Starts & Ends)
- Care Plan Time Frame:
- Payment Months: enter the number of months for the payment to be made. This represents the period of time the patient has to pay for the service
- 1 Month: Recurring payment Option 1 Only
- 2+ Months = All Payment Options Available
- NOTE: If you are setting up a 2-month care plan and offering Initial + Recurring Option 2, we recommend increasing the "Initial Goal" for the down payment to around 70%-75%.
- 1 Week: Recurring payment Option 1 Only
- 2+ Weeks: All Payment Options Available
- NOTE: If you are setting up a 2-week care plan and offering Initial + Recurring Option 2, we recommend increasing the "Initial Goal" for the down payment to around 70%-75%.
- Plan Months: ENTER ONLY IF different than Payment Months. Enter the number of months the service plan covers. This represents the period of time the patient is committing to use the services. This number does not affect the payment calculation.
- Payment Months: enter the number of months for the payment to be made. This represents the period of time the patient has to pay for the service
- Care Plan Discount: Slide ON or OFF, which Discounts will be shown on the plan
- Pay-Per-Visit- Fee: This will display the full price for the plan per visit for all services and products on the plan. This is a visual and calculation aid in showing the difference in the full price of the plan versus if the patient signs up at a discount price.
- Payment Plan: This will be applied to ALL services on the Payment Plan, except if alternate hardship discounts are set for the 2nd-4th+ plan members or to the NO CHARGE and FULL FEE under "Payment Plan".
- ChiroHealthUSA: Displays the discounted CHUSA fees for the plan.
- ChiroHealthUSA Plan: Displays the discounted CHUSA fees for the plan with the addition of the Payment Plan Discounts.
- CHUSA discounts cannot be changed per plan. Only one CHUSA option can be displayed on the plan at any one time.
- Click the [Add New Plan] button or [Add Template] if you are creating a template plan. Then click [OK].
Step 4. Care Plan
- Assigning Plan to Patient:
- Existing patient: Enter the patient name, company, patient ID, or TPS ID into the patient section menu. The menu will search for patients that match the information entered into the field.
- New Patient: If this is a new patient and they have no patient account, the Section Menu will state that there is “NO PATIENT FOUND” you may add a new account by clicking the [Add New] account icon to the right.
- Total Visits(Required): Enter the total visits the patient will be receiving over the treatment period. This will calculate the Ave$/ visits column.
- Discount Rules: Select Discounting Rules for each service/product.
- CHUSA Only
- Service (Routine): A Routine Service is categorized as a service that happens each and every visit, like an adjustment. This helps our system calculate the correct CHUSA discount/Max for this line item.
- Service (Non-Routine): A Non-Routine Service is a service that does not happen each visit, for example, a Progress Exam would be considered a Non-Routine Service. This helps our system calculate the correct CHUSA discount for this line item.
- CHUSA Only
-
Service and Products: Enter the service/product you want to include (If not already defaulted into the CPC)
-
Units: Enter the number of units for each service/product. Lines with no units are not included in the plan. You can edit the service/product descriptions and fees. (If not already defaulted into the CPC)
-
Actual Fees: Enter the Fee for the Service and Product (if not already defaulted into the CPC).
- When finished, click the [Calculate Care Plan] button at the top and bottom of the page.

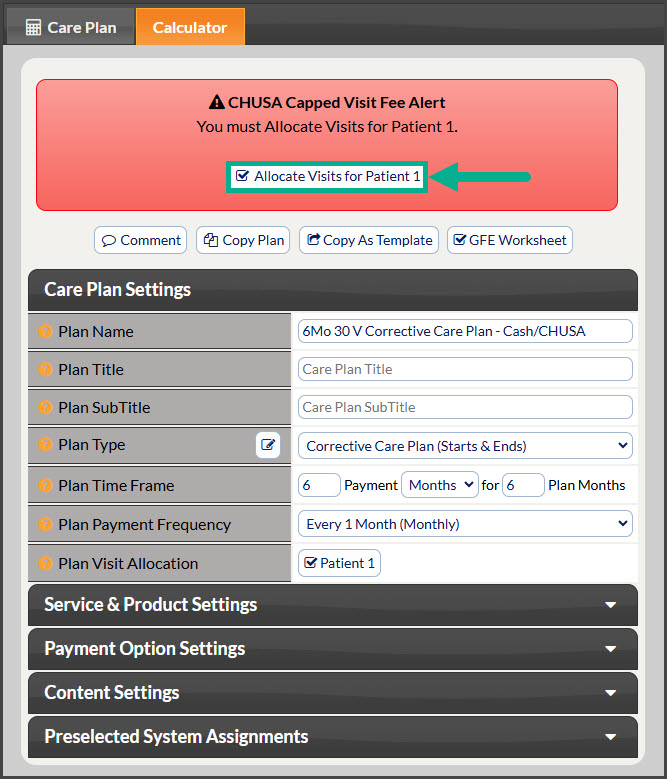
Step 5: Allocate
The page will be refreshed, and the plan preview will be displayed. For CHUSA plans only, there is one final step. Click the [Allocate Visits for Patient #] button.
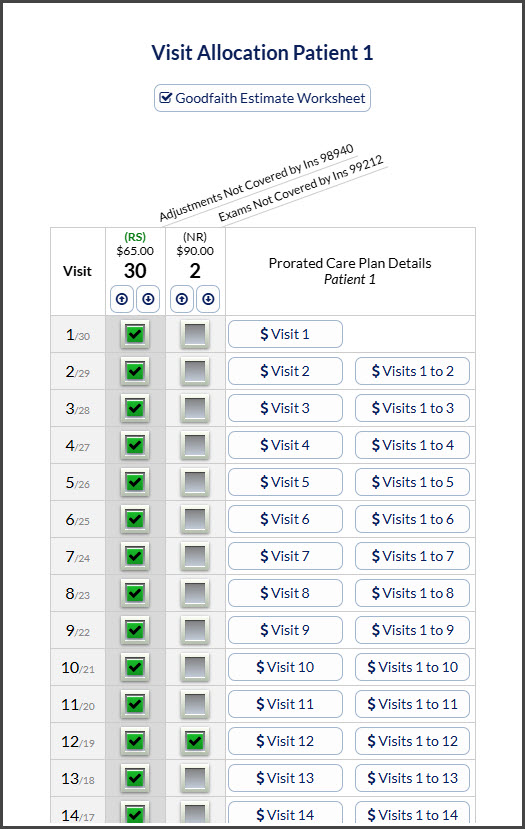
A pop-up window will appear to allocate the visits and designate which services are provided on specified visits. Click on the boxes or use the toggle arrows to determine which services will be performed at each visit. *Please note: The Care Plan specifically has the 2 tabs listed as Steps 1-2 for a reason. If you change the units on the Care Plan tab, you will have to RE-DO the allocation. Click the [Save] button.
This must be done in order for the proper ROUTINE SERVICE Max Per Visit calculations to be applied.
*If you have multiple patients on this plan, you must do this step for each patient.
Prorated Care Plan Details: This shows the accurate calculations per visit as well as the estimation between visits. Click HERE for more details.
Step 5: Calculator
The page will be refreshed, and the plan preview will be displayed. Here, you have the option to apply additional care plan settings from each section's drop-down menu on the left.
When done creating a care plan, click the View & Print Care Plan button to print the plan→ Click on the [Logo] at the top left corner of the document to print it.
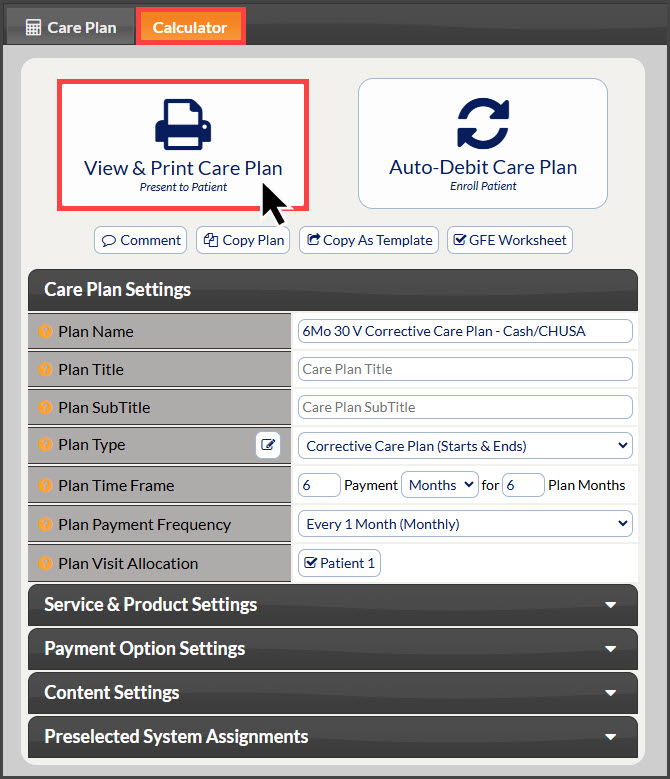
When done creating a template, click the [Use Template] button to use this template for a patient→ click [OK] to use the template.
