Instead of creating a new plan from scratch for each patient, simply create care plan templates for the most common types of treatment plans you'll be recommending.
For example, let's say in Dr. Jones' practice, for patients needing a program of correction, he typically recommends 30 visits over 6 months. (Yes, we know you don't want all patients on cookie-cutter plans, so this is an example to help you streamline creating customized plans.)
Upon completing the initial treatment plan, Dr. Jones transitions the patient onto a monthly wellness plan that includes 2 visits a month.
Dr. Jones will create a variety of templates:
- [Template] 6 months 30 visit Corrective Care Plan - Cash
- [Template] 6 months 30 visit Corrective Care Plan - XYZ Insurance
- [Template] 6 months 30 visit Corrective Care Plan - CHUSA
- [Template] 2 x month Wellness Care Plan - Cash
- [Template] 2 x month Wellness Care Plan - CHUSA
When Dr. Jones needs to customize a plan for an individual patient, he will locate the right template and make a copy of it.
Copying the template will allow Dr. Jones to make changes to any part of the plan so that it's customized for that patient. This saves Dr. Jones and his team a tremendous amount of time!
Getting Started:
Part 1: Create Templates
Step 1: When logged into Cash Practice, hover your mouse over the [Systems] menu → click on the [Care Plan Calculator®] → select [Add New Care Plan].
Step 2: Add New Care Plan/Template
- From the “I Want To” section, select the Action as [Add NewTemplate].
- Template Name: Enter a plan name using characters A-Z, a-z, and 0-9. You can either give a generic name such as "6 months 30 visit Corrective Care Plan - Cash" or a specific name. Choose a name that identifies the plan so it can be easily found when you have a large list of templates. NOTE: The template name is NOT seen by the patient. It is only viewable by account users, therefore the template name should be as descriptive as possible.
- Template Patients: Select the number of plan members. Up to seven members of a family can be on one plan.
- Template Type: Choose from Corrective Care Plan or Wellness Care Plan.
- Corrective Care Plan (Starts & Ends): For new patients. It is characterized by having a start and end date.
- Wellness Care Plan (Auto Renews): For established patients and is characterized as being ongoing.
- Block of Service: This plan is for patients who need an open-ended timeline for completing care. This only gives the option to pre-pay.
- Template Time Frame:
- Payment Months or Weeks: Enter the number of months or weeks for the payment to be made. This represents the period of time the patient has to pay for the service.
- 1 Month: Recurring payment Option 1 Only
- 2 Months: Recurring Option and Prepayment Opt 3 only
- 3 Months + = All Payment Options Available
- 1 Week: Recurring payment Option 1 Only
- 2 Weeks: Recurring Option and Prepayment Opt 3 only
- 3 weeks +: All Payment Options Available
- Plan Months or Weeks: ENTER ONLY IF different than Payment Months or Weeks. Enter the number of months or weeks the service plan covers. This represents the period of time the patient is committing to use the services. This number does not affect the payment calculation.
- Payment Months or Weeks: Enter the number of months or weeks for the payment to be made. This represents the period of time the patient has to pay for the service.
- Template Discounts: [DMPO/CHUSA users only] Slide ON/OFF which discount options will or will not be available.
- Click the [Add New Template] button and click [OK].
Step 3. Care Plan
- Total Visits(Required): Enter the total visits the patient will be receiving over the treatment period. This will calculate the Ave$/ visits column
- Discount Rules: Select Discounting Rules for each service/product.
- Service and Products: Enter the service/product you want to include (If not already defaulted into the CPC)
- Units: Enter the number of units for each service/product. Lines with no units are not included in the plan. You can edit the service/product descriptions and fees. (If not already defaulted into the CPC)
- Actual Fees: Enter the Fee for the Service and Product (If not already defaulted into the CPC).
- DMPO Cap: (optional) If using a DMPO like CHUSA, this is where your individual service caps will be entered or transferred to
- When finished, click the [CalculateTemplate] button at the top and bottom of the page.
Step 4: Calculator
The page will be refreshed, and the template preview is displayed. Here you have the option to [Use Template] and access to apply the additional Template Settings from each section drop-down menu.
When completed, either head back to the Systems menu, Dashboard, or [Duplicate Template] to start working on the next template.
Part 2: Copying Template for Enrollment
Step 1: Once the care plan has been saved and you are ready to enroll a patient into the plan, it's now time to make a copy of your template. Follow the sequence below.
- A: From your Dashboard, hover over the [Systems] menu
- B: Click on the [Care Plan Calculator®]
- C: Select [Add New Care Plan]
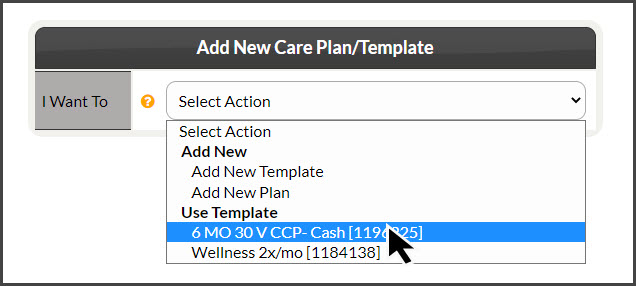
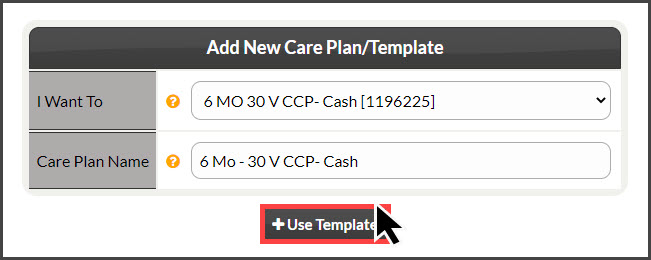
Step 2: From the “I Want To” drop-down menu, select the name of the template you would like to use under the “Use Template” section. Type in a "Care Plan Name" and click on the [Use Template] button.
Step 4: The page will then refresh and redirect you to begin editing your new care plan. Review the entire plan and make any necessary changes, and be sure to check and possibly edit the following:
- Care Plan: Assign a patient to the plan. Be sure to add them as a new patient if not already in the account
- Care Plan: Add any additional plan items
- Calculator: Either choose to leave or edit the Plan Name that now includes the copy date & time
- Calculator: [If applicable] Allocate any newly added plan items


